以下为本篇文章全部内容:
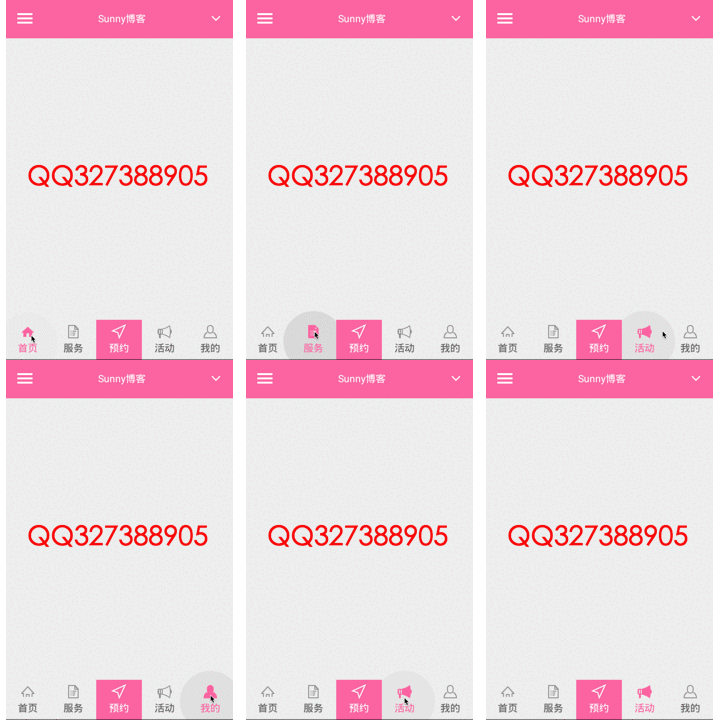
我们在很多项目里面都可以看到底部菜单顶部菜单这些,点击某个菜单或者分类之后该菜单或者分类就会显示不一样的效果了,就会特别明显的告诉我们这个是当前被选中的,会高亮的呈现在我们面前。如文章配图的效果一样。

那么我们如何在Android实现这样一个方法呢,今天我就跟大家分享一下如何实现这个功能。在正式上代码之前请大家先了解selector的属性,这样方便您阅读本文代码。
selector属性解析
选中状态:
android:state_checked="true|false" //true选中 false非选中
按下动作:
android:state_pressed="true/false"//true按下 false非按下
聚焦:
android:state_focused="true/false"//true聚焦 flase非聚焦
是否可选:
android:state_active="true/false"//true可勾选 false不可勾选
是否已勾选:
android:state_checkable="true/false"//true勾选 false非勾选
是否可勾选:
android:state_checked="true/false"//true可勾选 false不可勾选
是否可用:
android:state_enabled="true/false"//true可用 false不可用
窗口是否有焦点:
android:state_window_focused="true/false"//true窗口有焦点时 false窗口无焦点时
本文效果图用到效果属性:
android:drawable="@mipmap/home_check"//设置图片
android:color="@color/toolbar_bg"//设置颜色
选中切换图片footer_home_ico.xml:
<?xml version="1.0" encoding="utf-8"?>
<selector xmlns:android="http://schemas.android.com/apk/res/android">
    <item android:drawable="@mipmap/home_check" android:state_checked="true" />
    <item android:drawable="@mipmap/home" android:state_checked="false" />
</selector>
选中切换文字颜色footer_textcolor.xml:
<?xml version="1.0" encoding="utf-8"?>
<selector xmlns:android="http://schemas.android.com/apk/res/android">
    <item android:color="@color/toolbar_bg" android:state_checked="true" />
    <item android:color="@color/footer_textcolor" android:state_checked="false" />
</selector>
布局文件调用:
<?xml version="1.0" encoding="utf-8"?>
<LinearLayout xmlns:android="http://schemas.android.com/apk/res/android"
    android:layout_width="match_parent"
    android:layout_height="match_parent"
    android:orientation="horizontal">

    <RadioGroup
        android:layout_width="match_parent"
        android:layout_height="56dp"
        android:orientation="horizontal">

        <RadioButton
            android:id="@+id/home"
            style="@style/footer"
            android:drawableTop="@drawable/footer_home_ico"//调用切换图片的
            android:textColor="@drawable/footer_textcolor"//调用切换文字颜色的
            android:text="首页" />

        <RadioButton
            android:id="@+id/service"
            style="@style/footer"
            android:drawableTop="@drawable/footer_service_ico"
            android:textColor="@drawable/footer_textcolor"
            android:text="服务" />

        <RadioButton
            android:id="@+id/make"
            style="@style/footer"
            android:drawableTop="@drawable/footer_yuyue_ico"
            android:background="@color/toolbar_bg"
            android:textColor="@color/toolbar_title"
            android:text="预约" />

        <RadioButton
            android:id="@+id/activity"
            style="@style/footer"
            android:drawableTop="@drawable/footer_activity_ico"
            android:textColor="@drawable/footer_textcolor"
            android:text="活动" />

        <RadioButton
            android:id="@+id/member"
            style="@style/footer"
            android:drawableTop="@drawable/footer_member_ico"
            android:textColor="@drawable/footer_textcolor"
            android:text="我的" />
    </RadioGroup>
</LinearLayout>
今天的代码只有针对xml文件来实现,无需通过java来操作。因此只有xml部分的代码。
谢谢大家对本博客的支持,本站专注原创技术文章,三更半夜做实验写文章不易,且看且珍惜博主的心得。请转载带上本文链接注明出处。
扫二维码快速加群:

如果大家有什么疑问可以加我QQ327388905进行解答,也可以加入交流群
- 上一篇: php时间计算几天几小时函数
- 下一篇: PhpStorm 8 IDE 注册码和下载地址
- warning: setlocale: LC_CTYPE: cannot change locale (UTF-8): No such file or directory
- Unable to negotiate with xxx port 22: no matching host key type found. Their offer: ssh-rsa,ssh-dss解决办法
- 如何使用PHP和Epoll实现socket编程
- Mac zsh 出现 compinit:503: no such file or directory
- PHP编译出现 No package 'xxx' found 报错内容提示 pkg-config
- 关于go mod安装第三方包提示:module declares its path as: but was required as 解决办法
- macOS 安装 swoole 报错找不到 openssl/ssl.h 头文件
- Mac编译php扩展异常错误No such file or directory
- Sunny-Ngrok点赞送VIP隧道活动
- composer命令提示error:14090086错误

总赞数量:18276
总踩数量:128089
文章数量:29